
| “This site contains affiliate links for which OEMDTC may be compensated” |
NHTSA ID Number: 10126014
Manufacturer Communication Number: GCUS-9-3664
Summary
16188 Special Coverage. Some vehicles may have a condition where increased resistance in the body control module (BCM) connection system can result in voltage fluctuations or intermittency in the brake apply sensor (BAS) circuit that can cause brake lamp malfunction. Specifically, the brake lamps may either illuminate without the brake pedal applied, or turn off when the pedal is applied. If this condition occurs within the stated terms, dealers will attach the wiring harness to the BCM with a spacer, apply dielectric lubricant to the BCM X2 (C2) connector and the BAS harness connector, and relearn the brake pedal home position. The repairs will be made at no charge to the customer.
22 Affected Products
Vehicles
| MAKE | MODEL | YEAR |
| CHEVROLET | MALIBU | 2004-2012 |
| CHEVROLET | MALIBU MAXX | 2004-2007 |
| PONTIAC | G6 | 2005-2010 |
| SATURN | AURA | 2007-2009 |
Parts
| Quantity | Part Name | Part No. |
| 1 | Retainer-Brk Ped (Short Tie Strap – Pkg of 10) | 15188763 |
| 2 | Strap-EGR Tube (Long Tie Strap – Pkg of 10) | 11509086 |
| 1 | 14 Inch Tie Strap | Obtain Locally |
| 1 | Clip-Wrg Harn (Tie-Down Mount) | 13596990 |
| 1 (If Required) | Retainer-Acsry Wrg Harn (Rubber Spacer) | 13596991 |
| As Required | Promoter, Plastic Adhesion (4 OZ) (US) | 12378462 |
| Promoter, Plastic Adhesion (4 OZ) (Canada) | 10953554 | |
| As Required | Lubricant, Dielectric (2 OZ) (US) | 12377900 |
| Lubricant, Dielectric (2 OZ) (Canada) | 10953529 | |
| As Required | Woven Polyester Electrical Tape (PET) – Part Number 1089482 | Obtain from Kent Automotive |
SEOCONTENT-START
Special Coverage Adjustment
16188 Brake Lamp Malfunction
| Subject: | 16188-01 — Brake Lamp Malfunction |
| Models: | 2004–2012 Chevrolet Malibu |
| 2004–2007 Chevrolet Malibu Maxx | |
| 2005–2010 Pontiac G6 | |
| 2007–2009 Saturn AURA |
| Reference Number: | N162075260 | Release Date: | May 2017 |
| Revision: | 01 |
| Revision Description: | The bulletin has been revised to update the Warranty Information section to include the 14 inch tie strap in Net Item allowance, and to add a reminder to the Parts section. Please discard all previous copies of bulletin 16188. |
| Make | Model | Model Year | RPO | Description | |
|---|---|---|---|---|---|
| From | To | ||||
| Chevrolet | Malibu | 2004 | 2012 | ||
| Malibu Maxx | 2004 | 2007 | |||
| Pontiac | G6 | 2005 | 2010 | ||
| Saturn | AURA | 2007 | 2009 | ||
Involved vehicles are identified on the Applicable Warranties section in GM Global Warranty Management system. This site should always be checked to confirm vehicle involvement prior to beginning any required inspections and/or repairs.
| Condition: | Some 2004-2012 model year Chevrolet Malibu, 2004-2007 model year Chevrolet Malibu Maxx, 2005-2010 model year Pontiac G6, and 2007-2009 model year Saturn AURA vehicles may have a condition where increased resistance in the body control module (BCM) connection system can result in voltage fluctuations or intermittency in the brake apply sensor (BAS) circuit that can cause brake lamp malfunction. Specifically, the brake lamps may either illuminate without the brake pedal applied, or turn off when the pedal is applied. |
| Special Coverage Adjustment | This special coverage covers the condition described above for a period of 15 years or 150,000 miles (240,000 km), whichever occurs first, from the date the vehicle was originally placed in service, regardless of ownership.
For vehicles covered by Vehicle Service Contracts, all eligible claims with repair orders on or after March 3, 2017, are covered by this special coverage and must be submitted using the labor operation codes provided with this bulletin. Claims with repair orders prior to March 3, 2017, must be submitted to the Service Contract provider. Vehicle owners or lessees who paid for repairs referenced in this Special Coverage (“Customers”) are eligible for reimbursement of their reasonable and customary expenses in accordance with the procedures specified below. The conditional right to reimbursement is provided by GM solely in the interest of customer satisfaction and is personal to Customers. Customers may not assign and GM does not consent to any assignment of any Customer’s right to submit reimbursement claims, or to receive reimbursement, or any other rights granted by this Special Coverage to any third party, including but not limited to service contract providers, and this Special Coverage is not intended to and does not confer any third party beneficiary, subrogation or contribution rights, or any other rights to reimbursement, against GM, whether in law, equity or otherwise, on any third parties. |
| Correction | Dealers are to attach the wiring harness to the BCM with a spacer, apply dielectric lubricant to the BCM X2 (C2) connector and the BAS harness connector, and relearn the brake pedal home position. The repairs will be made at no charge to the customer. |
Parts Information
| Quantity | Part Name | Part No. |
| 1 | Retainer-Brk Ped (Short Tie Strap – Pkg of 10) | 15188763 |
| 2 | Strap-EGR Tube (Long Tie Strap – Pkg of 10) | 11509086 |
| 1 (Submit as Net Item) | 14 Inch Tie Strap | Obtain Locally |
| 1 | Clip-Wrg Harn (Tie-Down Mount) | 13596990 |
| 1 (If Required) | Retainer-Acsry Wrg Harn (Rubber Spacer) | 13596991 |
| As Required
(Submit as Net Item) |
Promoter, Plastic Adhesion (4 OZ) (US) | 12378462 |
| Promoter, Plastic Adhesion (4 OZ) (Canada) | 10953554 | |
| As Required
(Submit as Net Item) |
Lubricant, Dielectric (2 OZ) (US) | 12377900 |
| Lubricant, Dielectric (2 OZ) (Canada) | 10953529 | |
| As Required
(Submit as Net Item) |
Woven Polyester Electrical Tape (PET) – Part Number 1089482 | Obtain from Kent Automotive* |
* To obtain the PET tape, contact Kent Automotive at 1-888-937-5368 (USA), 1-800-563-1717 (Canada), or www.kent-automotive.com to request the special order part number 1089482. Dealers that do not have a Kent Automotive account or representative, must advise the Customer Service Representative that part 1089482 is being used for GM Bulletin 16188 to obtain special bulletin pricing. Do not order from GMCCA.
Warranty Information
| Labor Code | Description | Labor Time | Trans. Type | Net Item |
| 9900449 | Inspect Only – No Further Action Required | 0.1-0.3 | ZREG | N/A |
| 9900450 | BCM and BPPS Harness and Connector Repair
Add: Diagnostic Time |
0.5
0.1-0.3 |
ZREG | * |
| 9900451 | Customer Reimbursement Approved
– For USA and Canada dealers only – For Export dealers only |
N/A 0.2 |
ZREG | ** |
| 9900452 | Customer Reimbursement Denied – For USA dealers only | N/A | ZREG | *** |
* The amount identified in “Net Item” should represent the actual sum total of the current GMCCA dealer net price for 14 inch Tie Strap, plastic Adhesion Promoter, Dielectric Lubricant and Woven Polyester Electrical Tape needed to perform the required repairs, not to exceed $1.12 USD, $1.20 CAD, plus applicable Mark-Up or Landed Cost (for Export).
** For USA and Canada: Submit the dollar amount reimbursed to the Customer in Net/Reimbursement. Submit $20.00 administrative allowance in Net/Admin Allowance.
For Export: Submit the dollar amount reimbursed to the Customer in Net/Reimbursement.
*** Submit $10.00 administrative allowance in Net/Admin Allowance.
Service Procedure
Note: This special coverage ONLY covers the circuits between the brake pedal position sensor (BPPS) and the body control module (BCM). This special coverage does not cover normal maintenance and long term wear beyond normal useful life of components such as, but not limited to, stop lamp bulbs or the circuits between the BCM and the stop lamps.
- Verify proper operation of the stop lamps. Refer to the appropriate diagnostic information in SI.
- If the stop lamps are operating as designed, no further action is required. Inform the customer that any additional diagnosis and repairs are not covered under this special coverage.
- If the stop lamps are illuminated without depressing the brake pedal, perform the service procedure as outlined in this special coverage bulletin.
- If the stop lamps do NOT illuminate while depressing the brake pedal, determine if the condition is caused by the wiring and/or terminals between BPPS and the BCM.
- If the condition is NOT caused by the wiring and/or terminals between the BPPS and the BCM, inform the customer that any additional diagnosis and repairs are not covered under this special coverage. Refer to the appropriate diagnostic information in SI.
- If the condition is caused by the wiring and/or terminals between the BPPS and the BCM, perform the service procedure as outlined in this special coverage bulletin
Service Procedure Checklist
The following checklist is ONLY intended to supplement special coverage bulletin 16188. It is NOT designed to replace the service information. This checklist assumes that you have read, understand, and will closely follow all of the steps in the special coverage bulletin to ensure a proper repair. Please use this as a guide while performing the recall bulletin to ensure ALL of the required repairs are performed.
- Perform a terminal drag test on the brake pedal position sensor (BPPS) cavity terminals.
- Apply dielectric lubricant to BPPS cavity terminals.
- Apply dielectric lubricant to BPPS connector.
- Cut off existing gray tie strap to obtain more wiring harness slack for BCM connection.
- Remove tie strap from BCM connector X2 (C2) harness.
- Install NEW tie straps to BCM connector X2 (C2) harness.
- Perform a terminal drag test on BCM connector X2 (C2) terminals 18, 31, and 59.
- Apply dielectric lubricant to BCM terminals in cavity X2 (C2).
- Apply dielectric lubricant to connector face of BCM connector X2 (C2).
- Apply adhesion promoter, install tie-down mount, tie strap and rubber spacer to upper corner of BCM (Pontiac G6, Saturn AURA, and 2008-2012 Chevrolet Malibu).
- Clean the surface of the IP Mag Beam using an alcohol wipe, apply adhesion promoter, install tie-down mount and tie straps to IP Mag Beam (rubber spacer is not needed for the following models) (2004-2007 Chevrolet Malibu Sedan and Maxx, and 2008 Chevrolet Malibu Classic).
- Perform the brake pedal position sensor calibration.
Dielectric Lubricant Application Procedure (All Models)
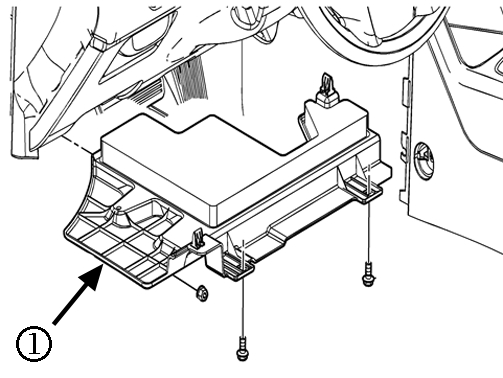
- Remove the driver side instrument panel insulator panel (1). Refer to Instrument Panel Insulator Replacement – Left Side in SI.
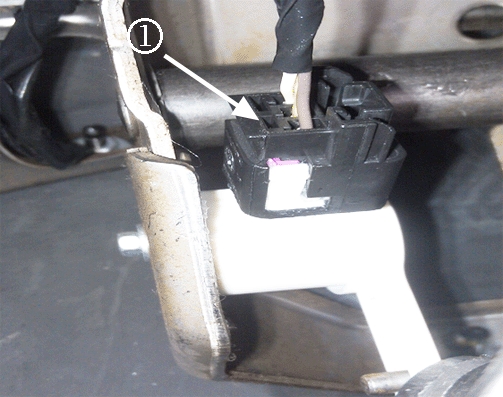
- Disconnect the Brake Pedal Position Sensor (BPPS) connector (1).
Caution: ONLY use test leads from J-35616-F, GM Terminal Test Probe Kit, to front probe terminals. Do not insert test equipment probes (DMM etc.) into any connector or fuse block terminal. Do not use paper clips or other substitutes to probe terminals. The diameter of an incorrect test probe will deform most female terminals. A deformed terminal will result in a poor connection and system failure.
When using the J-35616-F GM Terminal Test Probe Kit, ensure the terminal diagnostic test probe is the correct size for the connector terminal. Do not visually choose the terminal diagnostic test probe because some connector terminal cavities may appear larger than the actual terminal in the cavity. Refer to the connector end view in SI or the label inside of the J-35616-F GM Terminal Test Probe Kit cover to ensure the correct terminal diagnostic test probe is selected.
- Using terminal adapter J-35616-2A (GY), perform a terminal drag test on the BPPS connector terminals. Verify that the retention force is significantly different between a known good terminal and the suspect terminal. Replace any female terminal(s) in question.
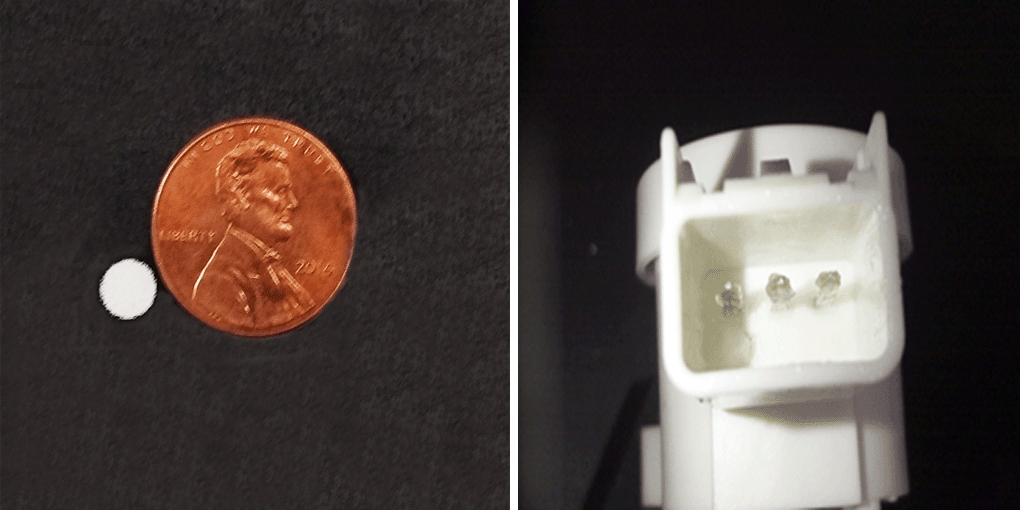
- Using the applicator stick, apply a smaller 5 mm x 5 mm x 5 mm dab of dielectric lubricant completely across all of the terminal pins in the BPPS connector cavity.
- Use a one-inch nylon bristle brush to spread the lubricant evenly onto all terminal pins.
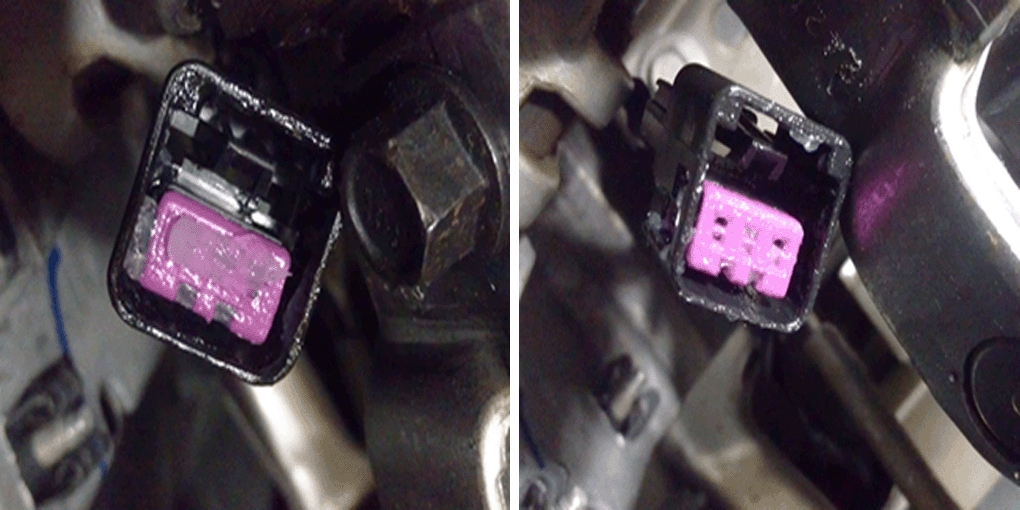
- Apply a 5 mm x 5 mm x 5 mm dab of dielectric lubricant completely across the connector face of the BPPS connector.
- Use a one-inch nylon bristle brush to spread the lubricant evenly into all terminal holes.
- Reconnect the connector back on the BPPS.
- Reinstall the driver side instrument panel insulator panel (1). Refer to Instrument Panel Insulator Replacement – Left Side in SI.
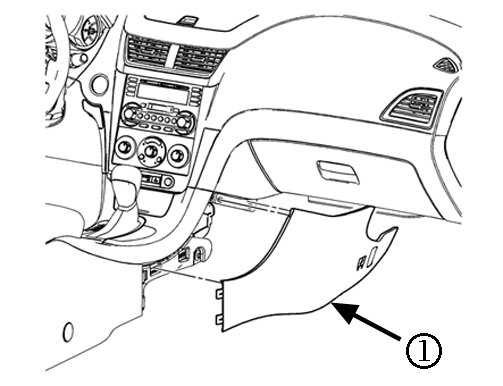
- Remove the right side front floor console side trim panel (1) to access the Body Control Module (BCM).
Caution: ONLY use test leads from J-35616-F, GM Terminal Test Probe Kit, to front probe terminals. Do not insert test equipment probes (DMM etc.) into any connector or fuse block terminal. Do not use paper clips or other substitutes to probe terminals. The diameter of an incorrect test probe will deform most female terminals. A deformed terminal will result in a poor connection and system failure.
When using the J-35616-F GM Terminal Test Probe Kit, ensure the terminal diagnostic test probe is the correct size for the connector terminal. Do not visually choose the terminal diagnostic test probe because some connector terminal cavities may appear larger than the actual terminal in the cavity. Refer to the connector end view in SI or the label inside of the J-35616-F GM Terminal Test Probe Kit cover to ensure the correct terminal diagnostic test probe is selected.
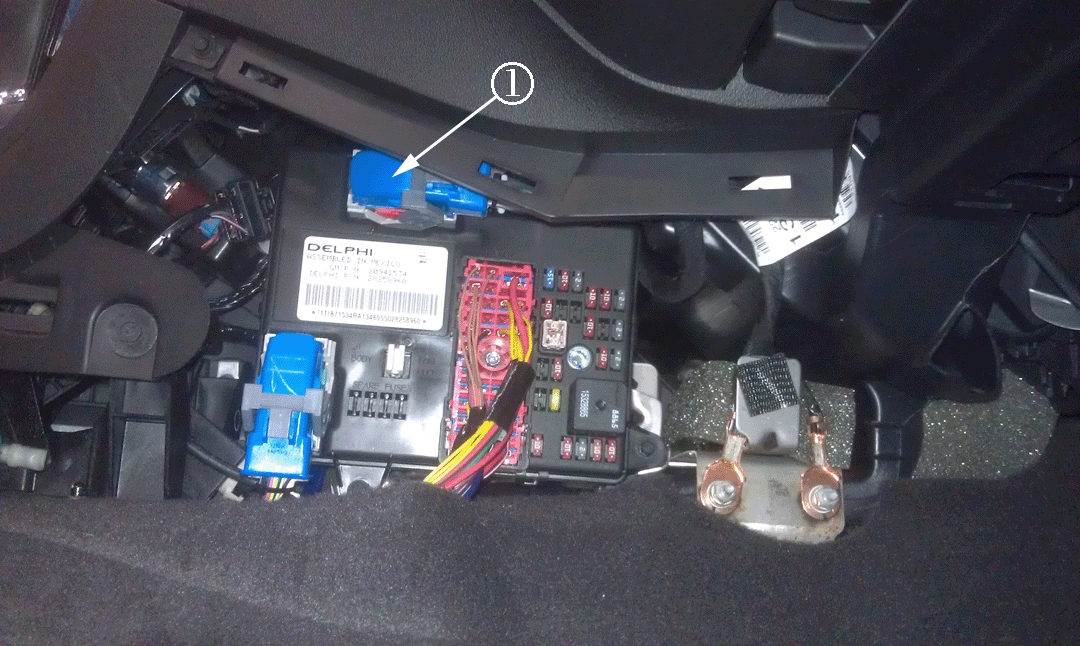
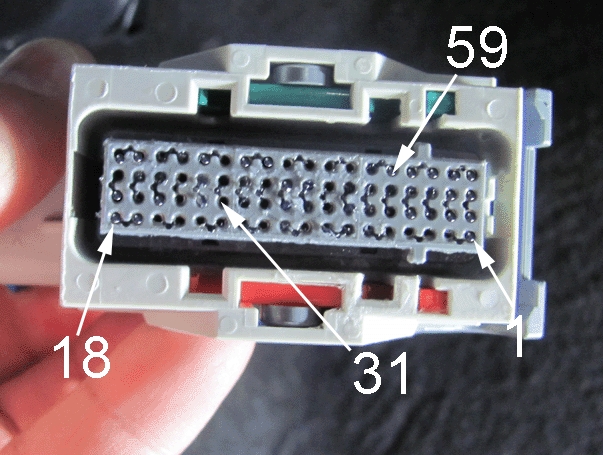
- Using terminal adapter J-35616-64B (L-BU), perform a terminal drag test on BCM X2 (C2) connector terminals 18, 31, and 59. Verify that the retention force is significantly different between a known good terminal and the suspect terminal. Replace any female terminal(s) in question.
- Remove the blue latch cover from the connector.
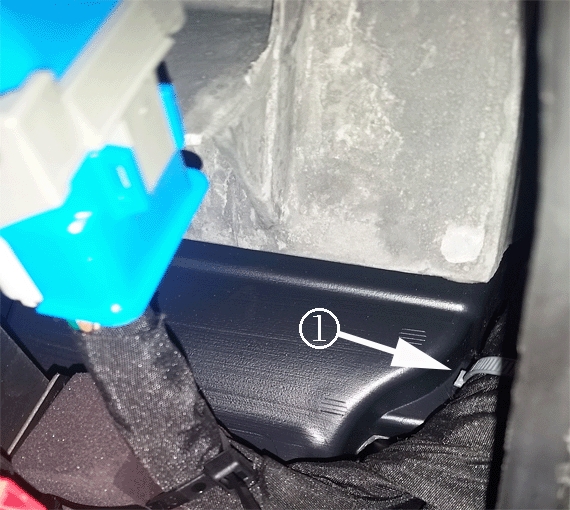
Caution: Be careful not to damage the harness when cutting the tie strap push pin.
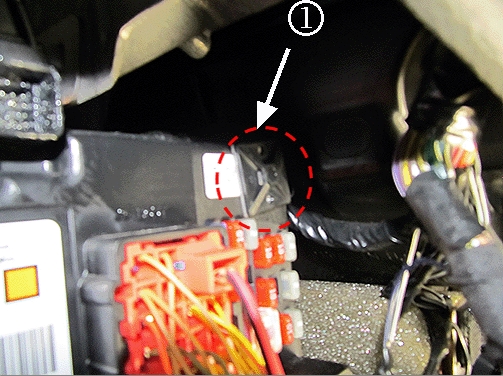
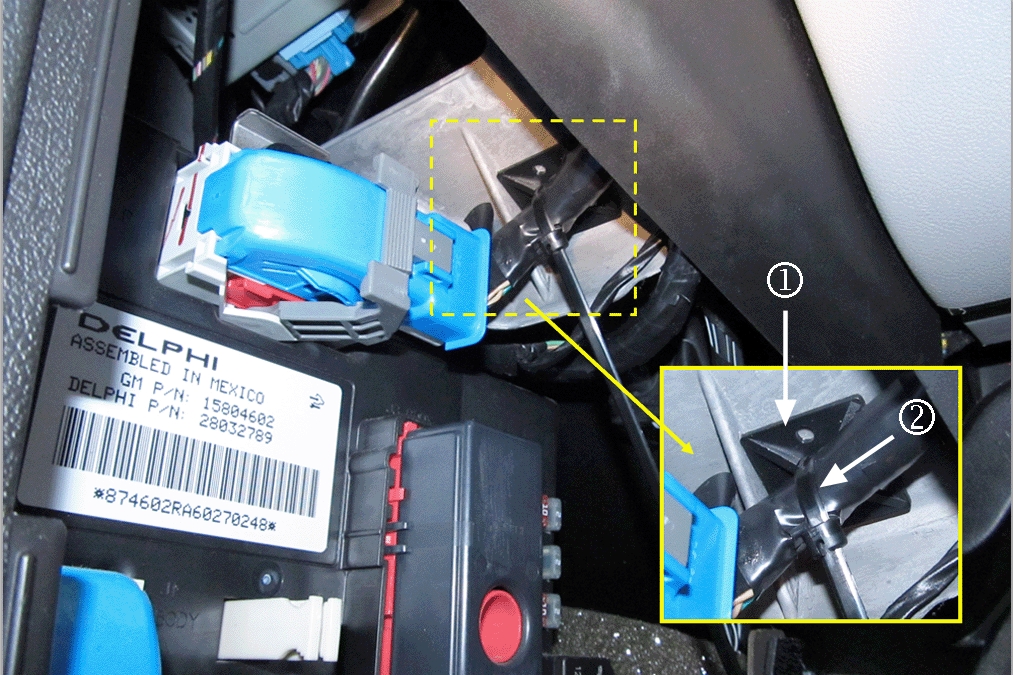
- Remove the tie strap push pin (1) from the instrument panel and cut it off of the BCM harness using side cutters. This will allow more wiring harness slack.
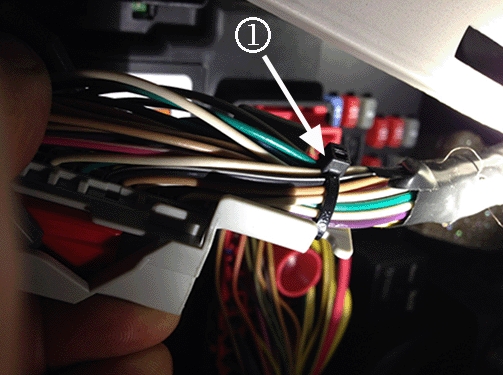
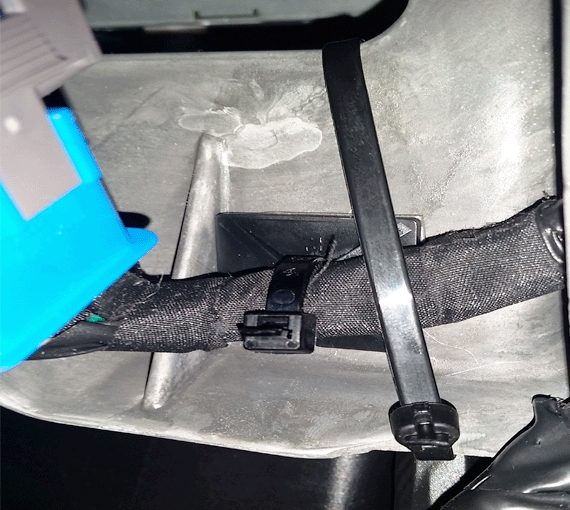
- To allow for installation of the tie strap added in the next step, remove the existing tie strap (1) from the end of the connector.
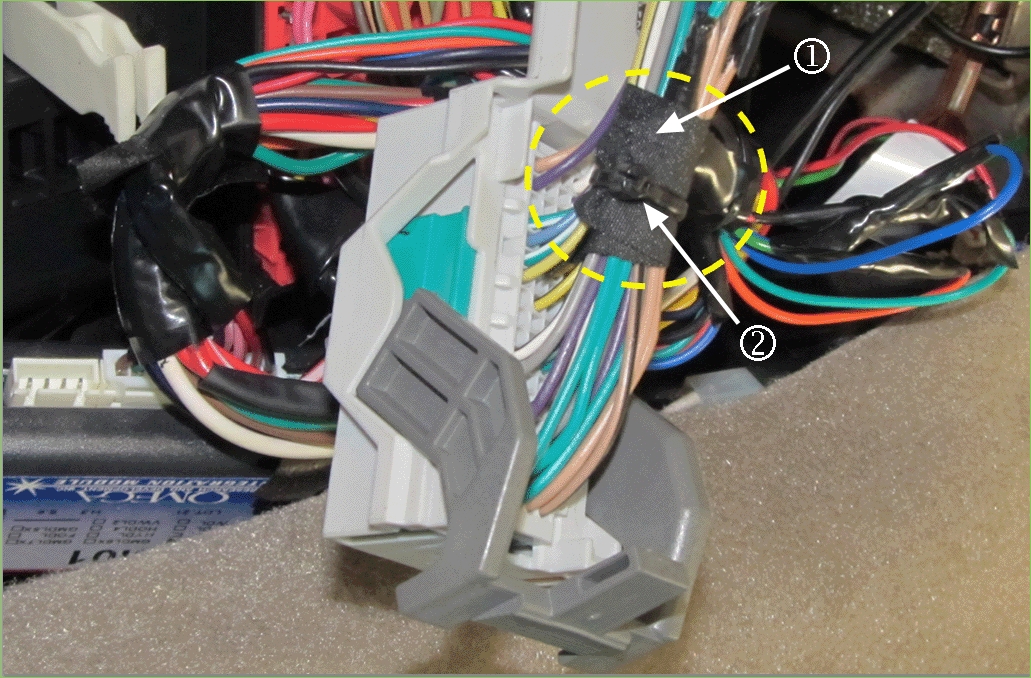
Important: ONLY use non-abrasion Woven Polyester Electrical Tape (PET). Do NOT use vinyl electrical tape.
Note: You will not be able to tie strap the complete bundle of wiring; exclude approximately the first three rows of the wiring bundle.
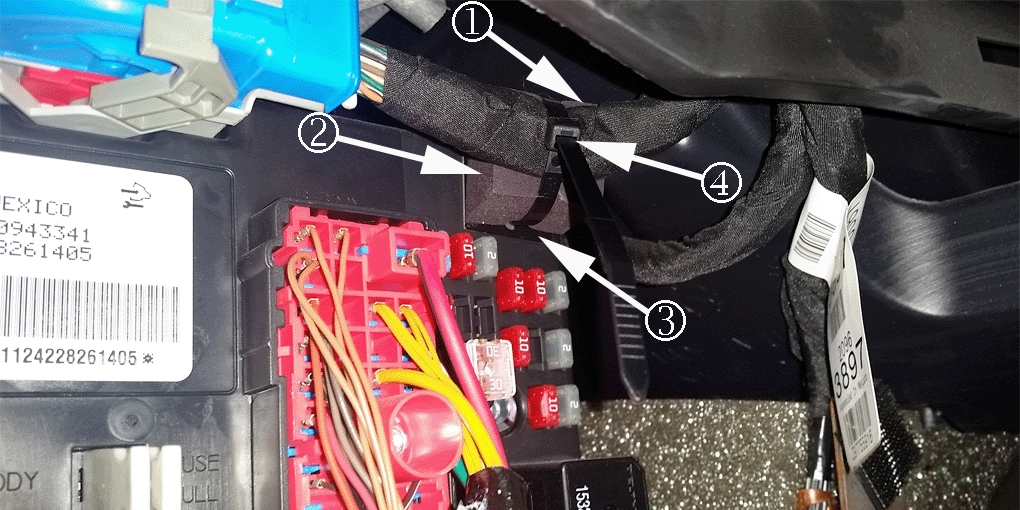
- Install Kent Automotive non-abrasion Woven Polyester Electrical Tape (PET) (1) and a new (short) tie strap (2) to the wiring within the BCM connector bundle.
- Once the additional short tie strap (2) is added, apply PET and install a new long tie strap (1) at the location where original tie strap was removed.
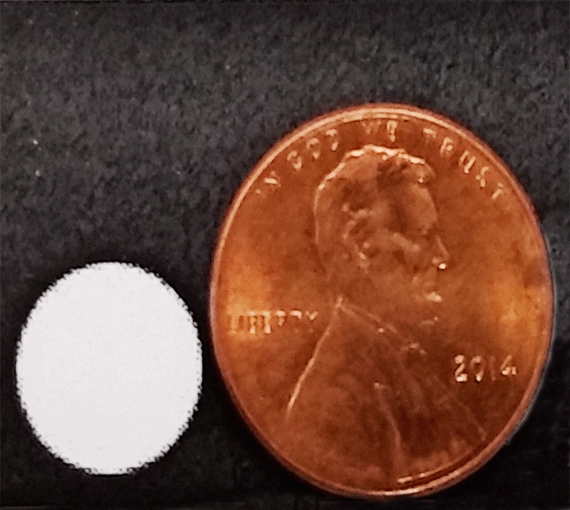
- Using the applicator stick, apply a 10 mm x 10 mm x 10 mm dab of dielectric lubricant completely across all of the terminal pins in the BCM connector cavity.
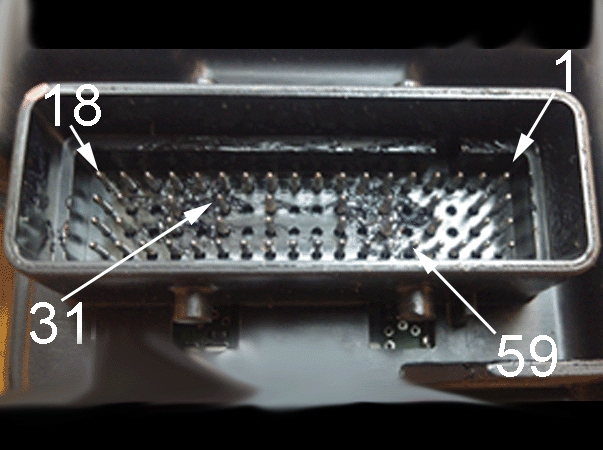
Note: Terminal 1 is called out for reference ONLY.
- Apply a 10 mm dab of dielectric lubricant (clear gel) completely across all of the terminal pins for connector X2 (C2) in the BCM. Verify that terminal pins 18, 31, & 59 are thoroughly coated.
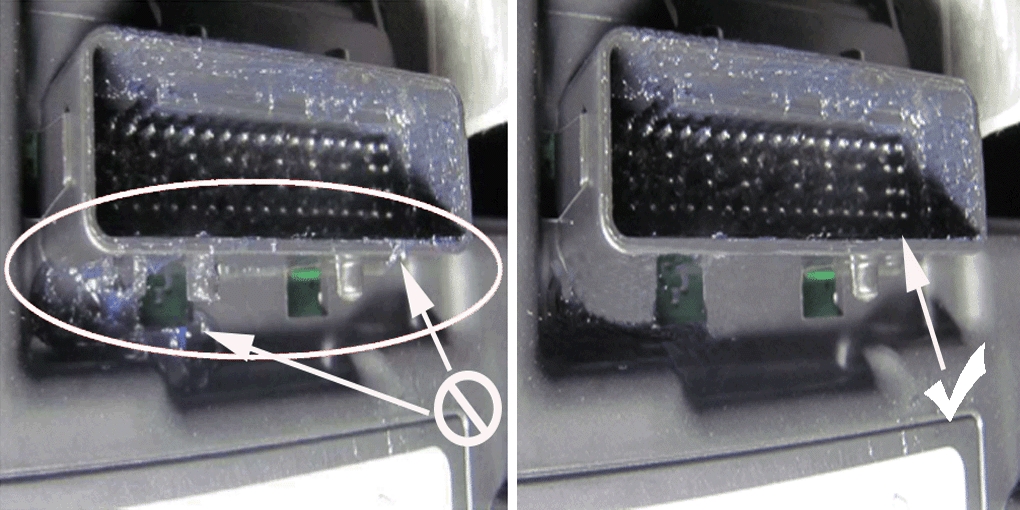
Note: Do NOT apply dielectric lubricant outside of the cavity for connector X2 (C2) in the BCM.
- Use a one-inch nylon bristle brush to spread the lubricant evenly onto all terminal pins.
- Again using the applicator stick, apply a 10 mm dab of dielectric lubricant completely across the X2 (C2) connector face of the BCM connector.
- Use a one-inch nylon bristle brush to spread the lubricant evenly into all terminal holes. Verify that terminal locations 18, 31, & 59 are thoroughly coated.
- Reinstall the blue latch cover to connector X2 (C2), reconnect the connector back on the BCM and re-latch.
- Wipe away any excess lubricant.
- Apply pressure to connector X2 (C2) to verify it is fully seated.
- Depending on vehicle model, follow the appropriate BCM Harness Tie Strap Installation Procedure below.
BCM Harness Tie Strap Installation Procedure
(Pontiac G6, Saturn AURA, and 2008-2012 Chevrolet Malibu)
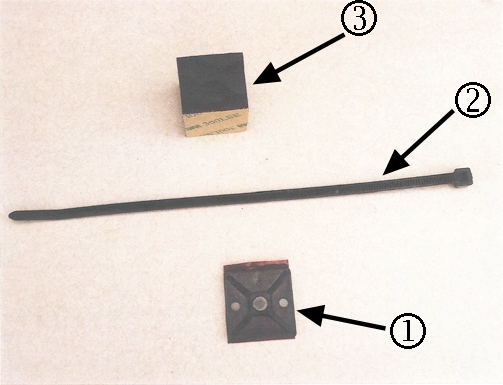
Note: The new tie-down mount (1), tie strap (2) and rubber spacer (3) will be added to secure the harness at the upper forward corner of the BCM.
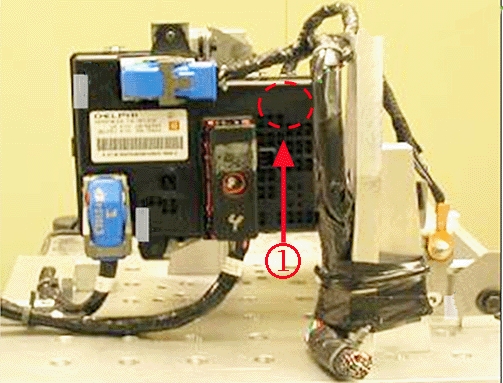
- Install the new tie down clip to the outboard, upper forward corner (1) of the BCM housing.
1.1 Carefully apply GM Plastic Adhesion Promoter the upper forward corner of the BCM.
Note: Ensure the orientation of the clip is such that the slot is in the vertical direction to accept the tie strap.
1.2 Peel the backing from the adhesive on the tie down mount (1) and install the mount to the BCM. Let the promoter and adhesive set up while applying the dielectric lubricant and tape.
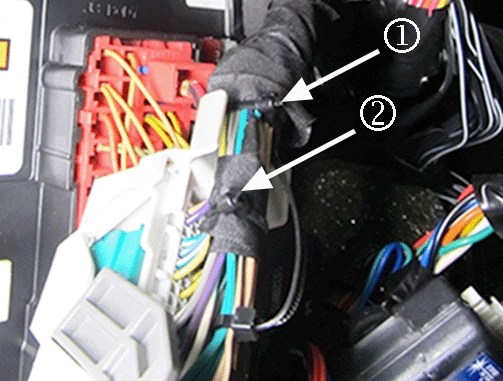
- Apply Kent Automotive non-abrasion PET to the BCM harness, covering the tie strap just outside the X2 (C2) connector, and extending to 25 mm (1 in) past the forward corner of the BCM as shown.
Note: Be sure to carefully cinch the tie strap completely so the harness is secured.
- Stack the new rubber spacer (2) on top of the tie-down mount (3) (installed previously), position the BCM harness across the spacer, install the long tie strap (4) through the slot on the mount and carefully cinch the tie strap.
- Reinstall the right side front floor console side trim panel (1).
- Perform the brake pedal position sensor calibration. Refer to Brake Pedal Position Sensor Calibration in SI.
- Verify proper operation of the brake lights.
BCM Harness Tie Strap Installation Procedure
(2004-2007 Chevrolet Malibu Sedan and Maxx, and 2008 Chevrolet Malibu Classic)
- Clean the surface of the IP Mag Beam using an alcohol wipe.
- Carefully apply GM Plastic Adhesion Promoter to the IP Mag Beam.
Note: DO NOT install the rubber spacer on the mount.
- Peel the backing from the adhesive on the tie-down mount and install the mount (1) to the flat underside surface of IP Mag Beam, in the location shown in the graphic above.
Note: Be sure to carefully cinch the tie strap completely so the harness is secured.
- Position the harness to the mount, install the long tie strap (2) through the slot on the mount, and carefully cinch the tie strap.
- Reinstall the right side front floor console side trim panel (1).
- Perform the brake pedal position sensor calibration. Refer to Brake Pedal Position Sensor Calibration in SI.
- Verify proper operation of the brake lights.
Customer Notification
General Motors will notify Customers of this special coverage on their vehicle (see copy of typical Customer letter included with this bulletin).
Customer Reimbursement
Customer requests for reimbursement of previously paid repairs to correct the condition described in this bulletin are to be submitted to the dealer prior to or by March 31, 2018. See General Motors Service Policies and Procedures Manual, Section 6.1.11 – Product Field Action Customer Reimbursement Procedure (USA & Canada) or local Policies and Procedures, for details.
March 2017
This notice applies to your vehicle, VIN:_______________________
Dear General Motors Customer:
As the owner of a 2004-2012 model year Chevrolet Malibu, 2004-2007 model year Chevrolet Malibu Maxx, 2005-2010 model year Pontiac G6, or 2007-2009 model year Saturn AURA your satisfaction with our product is very important to us.
This letter is intended to make you aware that some 2004-2012 model year Chevrolet Malibu, 2004-2007 model year Chevrolet Malibu Maxx, 2005-2010 model year Pontiac G6, and 2007-2009 model year Saturn AURA vehicles may have a condition where increased resistance in the body control module (BCM) connection system can result in voltage fluctuations or intermittency in the brake apply sensor (BAS) circuit that can cause brake lamp malfunction. Specifically, the brake lamps may either illuminate without the brake pedal applied, or turn off when the pedal is applied.
Do not take your vehicle to your GM dealer as a result of this letter unless you believe that your vehicle has the condition as described above.
What We Have Done: General Motors is providing owners with additional protection for the condition described above. If this condition occurs on your 2004-2012 model year Chevrolet Malibu, 2004-2007 model year Chevrolet Malibu Maxx, 2005-2010 model year Pontiac G6, or 2007-2009 model year Saturn AURA within 15 years of the date your vehicle was originally placed in service or 150,000 miles (240,000 km), whichever occurs first, the condition will be repaired for you at no charge. Diagnosis or repair for conditions other than the condition described above is not covered under this special coverage program.
What You Should Do: If you believe that your vehicle has the condition described above, repairs and adjustments qualifying under this special coverage must be performed by a General Motors dealer. You may want to contact your GM dealer to find out how long they will need to have your vehicle so that you may schedule the appointment at a time that is convenient for you. This will also allow your dealer to order parts if they are not already in stock. Keep this letter with your other important glove box literature for future reference.
Reimbursement: If you have paid for repairs for the condition described in this letter, please complete the enclosed reimbursement form and present it to your dealer with all required documents. Working with your dealer will expedite your request, however, if this is not convenient, you may mail the completed reimbursement form and all required documents to Reimbursement Department, PO Box 33170, Detroit, MI 48232-5170. The completed form and required documents must be presented to your dealer or received by the Reimbursement Department by March 31, 2018, unless state law specifies a longer reimbursement period.
The right to submit reimbursement claims is provided by GM solely in the interest of customer satisfaction and is personal to vehicle owners and lessees who previously paid for repairs referenced in this Special Coverage (“Customers”). Customers may not assign and GM does not consent to any assignment of any Customer’s right to submit reimbursement claims, or to receive reimbursement, or any other rights granted by this Special Coverage to any third party, including but not limited to service contract providers, and this Special Coverage is not intended to and does not confer any third party beneficiary, subrogation or contribution rights, or any other rights to reimbursement, against GM, whether in law, equity or otherwise, on any third parties.
If you have any questions or need any assistance, please contact your dealer or the appropriate Customer Assistance Center at the number listed below.
| Division | Number | Text Telephones (TTY) |
| Chevrolet | 1-800-222-1020 | 1-800-833-2438 |
| Pontiac | 1-800-762-2737 | 1-800-833-7668 |
| Saturn | 1-800-553-6000 | 1-800-833-6000 |
| Puerto Rico – English | 1-800-496-9992 | |
| Puerto Rico – Español | 1-800-496-9993 | |
| Virgin Islands | 1-800-496-9994 |
We are sorry for any inconvenience you may experience; however, we have taken this action in the interest of your continued satisfaction with our products.
Terry M. Inch
Executive Director
Global Connected Customer Experience
Enclosure
16188
SEOCONTENT-END
Special Coverage Adjustment
16188
Reference Number: N162075260
Release Date: March 2017
Revision: 00
https://www.nhtsa.gov/recalls?nhtsaId=10126014
https://static.nhtsa.gov/odi/tsbs/2017/MC-10126014-9999.pdf
To View or Download this Document Click Here
 Loading...
| “This site contains affiliate links for which OEMDTC may be compensated” |
- Seal Out Moisture and Corrosion From the Elements - Permatex Dielectric Grease Protects Terminals, Wiring, and Other Electric Connections From Salt, Dirt and Corrosion
- Keep Your Electrical Connections Safe - Seal, Lubricate and Insulate to Prevent Various Leaks or Damage Around Any Electrical Connection Ensuring Top Performance and Vehicle Quality
- High Performance Dielectric Tune-Up Grease Helps Extend the Life of Bulb Sockets, Ignition Coil Connectors, and Electric Connections Within Your Battery
- Required For Modern, High Energy Ignition - Permatex Dielectric Tune-Up Grease Ensures Automotive Performance, Extended Lifetime and Corrosion Prevention Within Electrical Systems
- Suggested Applications - Permatex Dielectric Tune-Up Grease is Appropriate For Spark Plug Boots, Trailer Hitches, Battery Terminals, and All Other Electrical Connections

- Protects electrical connections and wiring from salt, dirt and corrosion
- Prevents voltage leaks around any electrical connection
- Extends the life of bulb sockets
- Required for modern high energy ignition systems
- Suggested Applications: Marine and automotive electrical connections, spark plug boots, trailer hitches, battery terminals
- Essential for optimal performance in both electronic and standard ignition systems, ensuring reliability and efficiency in a wide range of electrical applications
- Fully compatible with high energy ignition systems, providing reliable performance and improved efficiency in advanced automotive engine setups
- Effectively seals out moisture and prevents corrosion, enhancing the durability and longevity of electrical connections in a variety of environmental conditions.
- Ideal for a wide range of applications, including sensor and computer connections, solenoids, truck pigtails, various types of plugs, ignition modules and coils, marine connections, diverse lighting systems, as well as for enhancing the connectivity and performance of batteries and terminals in various settings.
- Applying dielectric grease is crucial for ensuring enhanced electrical connections and superior performance, especially in harsh environmental conditions. This grease acts as a protective barrier against moisture, dirt, and corrosion, thereby maintaining optimal conductivity and reliability of electrical components in challenging settings.
- Simply turn the dial on the Select-A-Bead actuator to select the best bead width for your project.
- A unique, non-curing, opaque white gel compound used for sealing, protecting & electrical insulating. Improves electrical performance by reducing arcing & voltage drop
- Simply turn the dial on the Select-A-Bead actuator to select the best bead width for your project.
- Also ideal for lubricating plastic & rubber. Improves electrical performance in adverse weather conditions
- Patented finger-actuated delivery system for smooth, continuous coverage.

- 【SILICONE GREASE】A unique, non-curing compound used for sealing, protecting & electrical insulating. It also works excellently as a dielectric grease for spark plug grease, dielectric grease automotive, brake caliper pins, wheel bearing and car windows.
- 【DIELECTRIC PROPERTY】Are you still worried that all electrical components and connectors cannot be used safely? This dielectric grease for electrical connectors is vital - has good dielectric property, easily solving your troubles.
- 【ALL-IN-ONE KIT】Premium package includes 8oz silicone paste, a straight brush, a built-in curve brush and a towel. These will allow you to apply easily, saving you valuable time. At the same time, there will be no waste of silicone grease.
- 【EXCELLENT LUBRICANT】Electrical grease lengthen the life of rubber and plastic connectors and save your money by keeping them clean, insulated and supple. It is very ideal for you to routine maintenance of these products.
- 【OUR SERVICE】We value our products and customer experience. If you are not satisfied with what you receive, let us know. We are committed to meeting the needs of users and continuously improving our products.
- Ensure Waterproof Protection for Electrical Components: Utilize dielectric grease as an ideal solution for safeguarding your electrical components from moisture and corrosion. Our specially designed brush-top applicator allows for precise application, ensuring that the grease is applied exactly where needed, enhancing protection and longevity.
- Durable Shield Against Various Damages: Our premium dielectric grease forms an impenetrable, waterproof barrier that resolutely guards against oxidation, corrosion, and contamination from dirt, salt, and other elements. Its non-melting consistency guarantees steadfast protection even under extreme conditions, offering unmatched reliability and peace of mind.
- Versatile Silicone Lubricant for Diverse Applications: Beyond standard uses, our multifaceted silicone lubricant is impeccably suited for various automotive, electrical, and marine applications. Its broad compatibility with metal, rubber, and plastic makes it an excellent choice for rectifying sluggish car windows, ensuring smooth operation and extended functionality.
- Hassle-Free Application with Integrated Brush: Experience the utmost convenience with our attached applicator brush, enabling effortless and accurate grease application to the desired components. This feature bolsters ease of use, ensuring comprehensive coverage and enhanced protection for your electrical components.
- Proudly Manufactured in the USA: Confidently choose our dielectric grease, meticulously crafted in the USA, ensuring adherence to the highest quality standards and delivering superior performance and protection for your electrical components, guaranteeing optimal functionality and longevity.

- YOLOtek (Veteran owned) dielectric grease. Perfect solution for lubricating & protecting electrical connectors against corrosion. Made of high quality silicone which is resistant to high temperatures.
- A high-quality dielectric grease for electrical connectors. For batteries, spark plugs, fish finders, navlight port & more! Long-lasting formula. Silicone grease keeps contacts clean & corrosion free.
- Professional-grade dielectric grease is a perfect use for battery terminals. It is a long-lasting silicone grease that protects your terminals from corrosion & ensures optimal electrical conductivity.
- Easy Application: Trim tip to the right application for the job & save the rest for later. YOLOtek's silicone dielectric grease is easy to apply & will last a long time. (ONLY 169)
- YOLOtek US Veteran Owned. Great Products & Great Customer Service. Want to Talk to a LIVE HUMAN being on any questions or tips? Call YOLOtek.. 800 then 488 and 5512. Follow our Store for more updates!
- Seals And Protects: Our dielectric grease is a thick, long lasting waterproof synthetic silicone lubricant (lube) that prevents oxidation, inhibits corrosion & seals out contaminants such as salt & dirt; non-melting, stable consistency from -55-570 F
- Multitude Of Uses: Silicone paste / silicone grease is perfect for a variety of automotive, electrical and marine uses and compatible with a variety of materials, including metal, rubber and plastic; prevents voltage leaks around electrical connections
- Great For Many Common Tasks: Most common uses of marine grease including changing spark plugs, lubricating brake caliper pins, lubricating and preserving rubber gaskets, O-rings, hoses, weatherstripping, etc., and fixing sluggish car windows
- Applicator Brush For Ease Of Application: Applicator brush attached inside lid at an angle; product will be clear/transparent/translucent to slightly milky-white. Please Note: Applicator brush intentionally bent to maximize reach to jar edges
- Top Quality: Produced to the highest industry standards

- Package length: 2.032 cm
- Package width: 2.54 cm
- Package height: 20.066 cm
- Product Type: AUTO ACCESSORY
- RELIABLE LUBRICATION. High dielectric strength
- PROTECTS. Good thermal oxidation, and chemical stability. Provides a moisture-proof barrier that lubricates and protects electrical connections and wiring from salt, dirt and corrosion
- RESISTANT. Corrosion-resistant, dirt-resistant, salt-resistant
- MULTI-PURPOSE APPLICATIONS. Marine and automotive electrical connections, spark plug boots, trailer hitches and battery terminals
- PREVENTS voltage leakage around electrical connection. Extends the life of bulb sockets
Last update on 2024-04-09 / Affiliate links / Images from Amazon Product Advertising API
This product presentation was made with AAWP plugin.
1 thought on “Special Coverage Adjustment 16188 – Brake Lamp Malfunction – 2004-2012 Chevrolet Pontiac Saturn”